Vintage Postcards – Smoker’s Dreams – A series by Samuel L. Schmucker
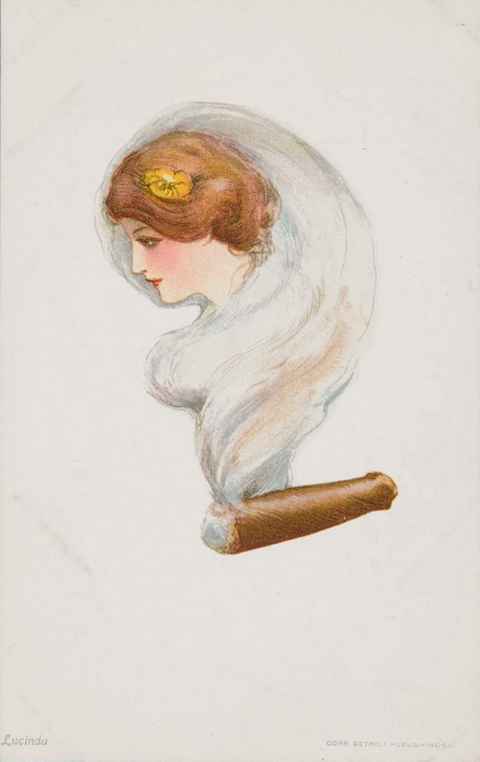
Samuel L. Schmucker created numerous postcards. The most collectible are fantasy series like the one presented in this post. It’s titled Smoker’s Dreams, and it was published by Detroit Publishing (sometimes also referenced as Det Pub) in 1907. The downsides of smoking were already known in those days, after all, Lucy Page Gaston had already founded the Anti-Cigarette League of America in 1899, and by the time of publishing these escapistic postcards, her organisation already had several hundred thousand members!
Fifteen of the USA states banned tobacco, tobacco products, and/or smoking in the wild times roughly between the beginning of the 20th century and the end of prohibition. Still, portraying tobacco products, which could be understood as a promotional activity, was totally acceptable. For another fine example, see The Smoker’s Year, a vintage calendar illustrated by Blanche McManus, published in 1903, or The Smoker’s Year Book by Oliver Herford and Sewell Collins, published in 1908.
Just one trivia: chewing and snuffing tobacco were, for a long time, more popular than smoking. Around 1900, several laws started prohibiting spitting because of the danger of spreading tuberculosis. This was a problem for chewing, but not for smoking. Cigarettes were unpopular for decades, but they were on the rise, and tobacco manufacturers were aware of that.
Smoker’s Dreams consists of six postcards (there should be more, but we can’t find them at the moment), and each one has a name. They also present different types of smoking, which were fashionable at the beginning of the 20th century. You’ll immediately notice cigarettes were not nearly as popular as pipes. Each card in the series features a woman’s head in a cloud of tobacco smoke.
Here they are:
Clarice
Laughing Waters
Lucinda
Maud Miller
Molly
Virginia
Several other artists decided on a similar concept, but none of them reached the success of Schmucker’s ladies. Why did all of them choose women?
There was probably more than one reason for that:
Pictures of women have already proved to have much better sales results than images of men or animals, or anything else.
A fantasy image of women appeals to women and men.
A market for women as tobacco buyers was only starting. Tobacco companies probably used their influence to connect images of women and smoking.
‘Smoker’s Dream’ expression is quite similar to ‘pipe dream’. Pipe dream represents an illusion, a fantastic story, a hope. While we all need hope to move on, too much wishful thinking leads to escapism. When escapism starts messing with our dealings with reality, we have a problem. That’s why all drugs, including tobacco, are problematic and can very quickly become dangerous. Legal or illegal, they are always destructive!
For some people, it’s hard to believe, but many people can’t name all Zodiac signs in order. To avoid such mistakes, we created a hand scheme where each of the Zodiac signs (sometimes called the Horoscope signs or Animal circle) is represented with a graphic symbol. They are arranged in a circle. This is the essence of the problem. The circle has no definitive beginning or end. Some people prefer starting with January, just like the conventional calendar based on the virtual Sun movement starts, but traditionally the Sun year starts in the Spring, with March 21, when the first Horoscope sign Aries begins. Each sign lasts one full month, but months are not all of the same length, so the beginnings of Zodiac signs are not always on the 21st day of the specific month.
However, our mission was just to place them in the correct order. Aries is the first, Taurus the second, and so on until the sign of Pisces, formally the twelfth sign, which is followed by Aries. Then everything repeats.
To create the Zodiac wheel, we took Public Domain images by Felix Vallotton, published in the book titled Colorful Bird, in 1896. Each symbol was cropped, edited, and compressed by FastStone. All of them were imported in Inkscape and arranged in proper order. The names of the months were added with March as the first month in Spring on the top. When everything looked good, the image was exported in PNG format (best quality), but in this post, we used the JPG format (optimal for web pages).
The image in this post is available to everybody according to Creative Commons 4.0 license. You are welcome!
Yes, yes, I know, AI will do that better, but I still believe we shall keep some basic skills for life and work (if, there’s a difference). So this is my way to help you to stay sharp and operational. Someday, your grey matter may come in handy.
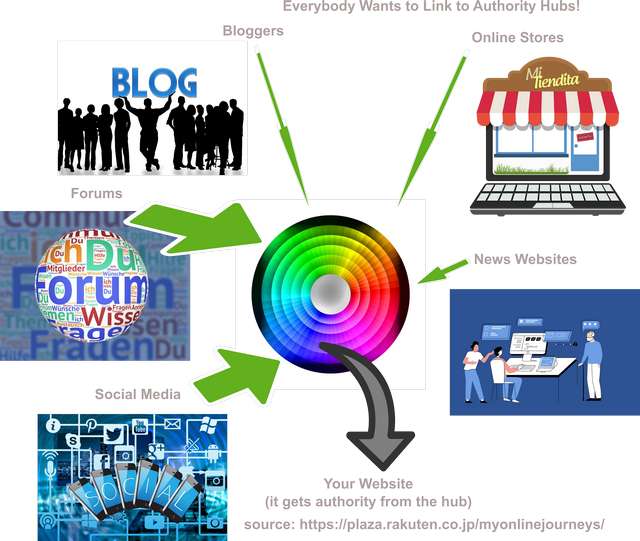
My mission was to create a simple visual representation of an authority hub.
Some may ask ‘What is an authority hub?’
Well, it’s a website with two basic characteristics:
It is a hub. This means it serves as a starting point of research even if you actually don’t know what you are looking for. Let me give you an example. You go to the library and ask the librarian for recommendations about a book. Of, course, you want something you perceive as good reading, yet the librarian probably has no idea about your taste in reading.
But, on the other hand, you are in a library. There are very likely many books you can enjoy. Probably way more than you can consume in a lifetime. You just have to find the right one. The librarian can help by knowing more info. Are you looking for something serious or humorous? Fiction or non-fiction? For kids or grown-ups? Lengthy encyclopedia or skinny booklet? Prose or verse? The library has everything (almost), but you have to go through the process.
The authority hub on the internet serves quite similarly. Let’s imagine you are looking for vintage illustrations and you bump into a website:
Suddenly, you become an expert on this specific fairy tale. The story you probably didn’t think about for many many years! See? Authority hub (in this case vintageillustrators) helped you to discover something you didn’t even know you were interested in!
It has authority. Authority on the internet translates into links. When a certain hub proves so useful as the one mentioned above, it attracts attention. A lot of people want to link it. This is how reputation is built. A reputable entity has an authority.
Now you know what the authority hub is.
Let’s go back to my assignment. I had to present that visually. Using pictures of books is an obvious choice. So I opted for something else. I decided to start with a rainbow. It has everything, just like a perfect authority hub (by the way, a perfect authority hub doesn’t exist). It’s also made of numerous useful fragments (a rainbow is made of different colors, for instance), which can be split into many different smaller pieces (we can use wavelengths or shades or something).
I decided to make two pictures, one to present outgoing info, and one with incoming links.
My resource was Pixabay. At first, I didn’t know what kind of graphics would do best. I have found a few nice-looking illustrations and decided to use illustrations only.
Then, I inserted all the graphic material into Inkscape.
After some rearrangements, I just had to add arrows and text.
Voila:
This is how the authority hub works.
And this is how the authority hub gets authority.
Let me add a link to the article, where these graphics are actually used.
Coloring pages are a popular free activity for kids and adults. With easy access to spectacular images on the internet, we are obviously entitled to ask how to create coloring pages without drawing them ourselves. There are actually free online services offering to that instead of us for free or for a small fee, but this post will show you how to create a coloring page from an image without them. This means you won’t spend a dime.
The process is easy, fun, and fast. It will also give you useful knowledge which may come in handy for other projects. After all, we live in a visual world.
Obviously, we will need three things:
An image.
A graphic editor.
Time.
Image
Numerous services are offering all kinds of images for free. Most of them are photo-oriented but it’s better to use drawings, clipart, illustrations, and similar types of images with clear lines. After all the essence of coloring pages is coloring inside the lines, so it’s best to already have them, right?
The other condition (free) can be a bit tricky. Many services declare themselves as free but offer their images with all kinds of limitations. Some want an attribution (e.g. backlink with the name of the author), some limit the use of specific images with strict conditions (just personal use, no derivative products, etc.), and some are not free at all.
Still, a few services meet both criteria: they offer images with clear lines (e.g. clipart) for free (you can do with them whatever you want, including selling them). My favorite service is Pixabay. (A very nice alternative is Openclipart.) They offer millions of photos but also illustrations and vectors. You can neatly use the search option with the filters listed below the search window, where you can not only limit your search to e.g. vectors only, but also define the preferred orientation, size, and color of the image. These images can be sorted by date, so you can limit the results to just new uploads if you intend to use the service only from time to time to check if something new is uploaded.
It’s time to try it!
Let’s say we decided to make a mermaid coloring page. We just enter the mermaid into the search box and choose vectors on the right side.
Coloring pages are a popular free activity for kids and adults. With easy access to spectacular images on the internet, we are obviously entitled to ask how to create coloring pages without drawing them ourselves. There are actually free online services offering to that instead of us for free or for a small fee, but this post will show you how to create a coloring page from an image without them. This means you won’t spend a dime.
The process is easy, fun, and fast. It will also give you useful knowledge which may come in handy for other projects. After all, we live in a visual world.
Obviously, we will need three things:
An image. A graphic editor. Time.
Image
Numerous services are offering all kinds of images for free. Most of them are photo-oriented but it’s better to use drawings, clipart, illustrations, and similar types of images with clear lines. After all the essence of coloring pages is coloring inside the lines, so it’s best to already have them, right?
The other condition (free) can be a bit tricky. Many services declare themselves as free but offer their images with all kinds of limitations. Some want an attribution (e.g. backlink with the name of the author), some limit the use of specific images with strict conditions (just personal use, no derivative products, etc.), and some are not free at all.
Still, a few services meet both criteria: they offer images with clear lines (e.g. clipart) for free (you can do with them whatever you want, including selling them). My favorite service is Pixabay. (A very nice alternative is Openclipart.) They offer millions of photos but also illustrations and vectors. You can neatly use the search option with the filters listed below the search window, where you can not only limit your search to e.g. vectors only, but also define the preferred orientation, size, and color of the image. These images can be sorted by date, so you can limit the results to just new uploads if you intend to use the service only from time to time to check if something new is uploaded.
It’s time to try it!
Let’s say we decided to make a mermaid coloring page. We just enter the mermaid into the search box and choose vectors on the right side.
Please note that the first line of the results comes from Pixabay’s sponsor – iStock. These images don’t meet our criteria above, so just ignore them.
Then simply scroll through the results (90+ of them, as Pixabay claims). Some of them are already in black and white, so you can theoretically use them for coloring pages right away. But that wouldn’t be a challenge. Let’s pick one with the colors. Cute mermaid image which already suggests how attractive might the final result be.
On the right, close to the top of the screen, you’ll find options for downloading. You can choose between raster and vector format. If you pick a raster you can choose between different resolutions. In this case, more is better.
If you pick vector format, you will get the image in AI format with AI standing for Adobe Illustrator. While vectors are great for creating coloring pages, we would rather take the PNG format in the highest available resolution. In this case, we need only one program – GIMP as a free and open-source alternative to PhotoShop. The main difference is, of course, price. PhotoShop can’t be bought, only a subscription is possible – between 38 USD and 90 USD per month. PhotoShop offers much more than GIMP but most people will never need them.
This is why we prefer GIMP, which is available in dozens of languages.
Program
Our choice is GIMP.
You can also choose between standard and portable versions. They are both free, of course. Download and install it.
Let’s get to work!
Open GIMP and import an image (ctrl-I, then click on the image – picture of mermaid in our case).
Select a complete area on the screen (ctrl-A), click Filters on the menu, and then choose Recognize Edges and Edge)
Just click O.K., and you’ll get the black picture with visible edges, but without colored areas within. If you can invert black areas to white and edges to black, you’ll get a black-and-white drawing, which is actually a coloring page.
This can be simply done by selecting Colors in the menu and then clicking Invert.
The coloring page is already here, yet we still need to convert all colors (except white areas, of course) to black. If your printer is capable to print in black and white only, you can skip the next step and simpl export the file or print it without exporting.
The conversion into black-and-white (and grey) is done by another set of commands: choose Image from the menu, then pick Mode and Greyscale:
Voila!
Now export your image (you probably want PNG format) into the desired resolution (pick File from the menu and Save As). That’s it.
With this simple and completely free procedure, I created dozens of Mermaid Printable Coloring Pictures, which are (it’s only fair) absolutely free for you and your friends to print and enjoy.
If you found this recipe useful share it with your friends. Don’t forget to tell them about coloring pages of mermaids, too!
Jessie M. King was an extremely prolific and versatile artist. Yet it’s hard to find her illustrations of classic fairy tales. I explored numerous corners of the internet to find only a few examples of her interpretations on this subject.
The low amount of material is even more surprising if we know that medieval and fairy themes were her favorites. The presented pictures of the popular scenes from best-known fairy tales are not from any book that I know although she is supposed to illustrate and design close to one hundred books.
The closest of all is How Cinderella Was Able to Go to the Ball which is essentially a textbook on batik, a special technique for coloring textiles with the use of wax. The Story of Cinderella is used only as a frame for the presentation of the process.
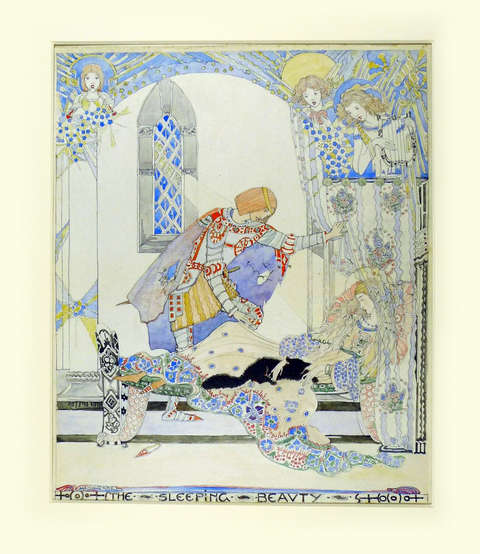
More than one illustration of a specific fairy tale I manage to find only for Sleeping Beaty. Even in this case, we have three illustrations of only two scenes. I can’t offer an explanation of the famous scene with the sleeping princess outside.
Maybe we can use some of the missing scenes from Jessie’s contemporary Frances Brundage, where several scenes are missing as well? Here is a chance to compare completely different styles of two famous artists from the beginning of the 20th century: Sleeping Beauty by Frances Brundage.
The next illustration is another interesting story on its own. It belongs to the fairy tale Beauty and the Beast. While other artists used the opportunity to get wild with their own interpretations of the Beast, Jessie focused on the Beauty only.
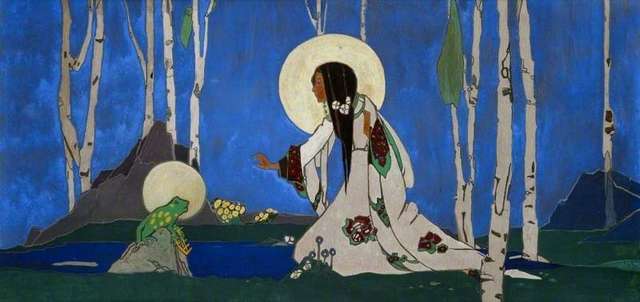
We are not over yet. Here is an interesting picture of the introductory / meeting scene from The Frog Prince. You’ll notice both characters have heads surrounded by some kind of circle, resembling the helmets of the astronauts. Or aureoles of the angels, maybe?
King, Jessie Marion; The Frog Prince; Glasgow Museums; http://www.artuk.org/artworks/the-frog-prince-84729
Jessie Marion King loved to portray fairies, mermaids, and angels. Creatures out of this world definitely made her heart tick. Maybe due to her experience of sleeping outside under the sun and waking convinced she was playing with fairies?
Our final example of Jessie’s view on classic fairy tales comes from the Pied Piper of Hamelin. Technically it’s not a fairy tale but a legend, yet numerous publishers put the story as a cautionary tale into collections of fairy tales and other stories for children.
The dark environment from the Pied Piper of Hamelin obviously didn’t bother the artist. She just portrayed a tranquil scene of the Piper playing his magical flue and children dancing happily around.
While another of Jessie’s famous contemporaries Kate Greenaway used similarly bright colors, she still infused the horrifying tones into her work. To every illustration, not just the ones from the end of the story.
Did we learn something about Jessie Marion King? Can we say she was pretty particular about the stories she illustrated? Always choosing only the parts in tune with her perception of the world as should be?
If I find additional pictures for this post, I’ll add them ASAP.
Advent is time for magic. Why not use it for spending some quality family time with storytelling?
There are 24 evenings before Christmas and each one of them can be dedicated to one story. You can tell whatever you want, according to perception of your children, of course, but to make it easier for you there’s already a nice printable advent calendar (in two parts, with 12 pictures on every sheet of paper), where a selection of classic fairy tales, fables, and legends is already made.
This is how the images look:
To make the most of this lovely idea, visit the website under the clickable link above and get both pages in high resolution. At the same address you’ll find many other free advent calendars ready to print as well.
I am not qualified to rank spell checkers but I can tell you this:
When I started working on the internet, I soon realized I should write in English. I can communicate in English but writing a quality article whicc competes with millions of articles written by native speakers?
Nah!
I had to create complicated schemes with native speaker from Great Britain and USA to get a few of my articles edited to degree where they could be submitted (and accepted) by huge portals with rigorous rules about language quality.
I will show you a difference between my article (published on less demanding service ten years ago) that was unpublished due the death of the service for many years, and the same article republished at different address a few hours ago.
This is the Grammarly’s analyse at the begining:
As you can notice, there is a large area, where you can copy-paste the article. There is a possibility to write right into it, but I advice against that. It can be a very stressful experience.
Right side of the screen is reserved for different options and I will point only at three of them:
1. Overall score.
This is a number between 0 and 100 where more is better. In general, everything above 80 is considered as a quality stuff. As you can see my score is just 36.
2. Suggestions.
There are four types of suggestions and not all of them are available in free version. I focus just on correctness and clarity, in most cases following all suggestions on correctness and mostly ignoring suggestions on clarity.
3. Premium
Yes, there is a premium/payable version. I can’t afford it at the moment. The investment would simply not be justified according to the money earned by writing for web.
This is how things look after two minutes of editing (mostly following the Grammarly’s suggestions):
As you an see, my overall score is 80. With premium version there would be more than 50 more suggestion, probably putting the score at 98 or more. Some of these suggestions, like punctuation, could be guessed by trial and error method but I decided to not bother ewith this for that particular article, aiming just to blogosphere.
Conclusion: I cordially recommend you to use Grammarly, especially if you are not a native speaker. It helps me tremendously with placing articles (not used in my native language), finding spelling errors and typos, staying faithful to the usage of the right tense in the sentence, …
All in all, great stuff.
And it’s only fair to give you an access to this article at the current position:
Stollwerck is well-known by their chocolate for more than a century and a half. For some time they were among the biggest chocolate producers in the world. They are still one of he best known brands in the field although they were bought by bigger business.
Everybody knows that. But I had no idea they promoted their chocolate bars by collectible cards, designed by the best German artist of the time. This happened frem the end of the 19th century to the end of th Great War (WW1).
They used different themes organized in groups of six (half a dozen is an obvious choice for a baker and his sons who made the company in the 19th cetury).
I cordially advise you to visit this short oline exhibition:
The book was published in 1902, author and illustrator died more than 70 years ago, so there was no copyright issues. But the book (with numerous lovely illustrations was available in PDF form only. To publish a post with pictures from the book, i have to extract illustrations in JPG format.
So I have to download PDF file and convert each page to JPG graphic format. This was not my first try to do that and I used many different tools. You can use hundreds of them and many of them are available online for free (with some limitations which, in my case, were not important).
If you find yourself in the same situation I kindly recommend this service:
You’ll find many more converting options (different formats) on the same site. But I wanted to only get JPGs from downloaded PDF. It took me only a minute and all pages were nicely packed into ZIP file named ilovepdf…
I unpacked it, deleted the pages I found of no use for my project, edited some of the ones I wanted to use (I will make another post about editing), write a post and publish it with selected images on one of the blogs I work on.